
Saturday, October 27, 2012
Letterpress cards for Halloween 2012A
Halloween cards are part of the fun of the season. Here are my 2012 cards. I used the Letterpress L by Epic for the background...note it is in two colors! The spider web and the greeting were also Letterpressed. It is a fun process. It requires you to think about placement and design before you begin printing. Once the items to be pressed are in place it is time consuming to move them around.
 If you like the design it could be easily done in stickers or stamps. The bat is a sizzix die.

Tuesday, August 21, 2012
This is an example of a finished travel or journal folder. At the most the original folder will cost no more than 20 cents. I used stiff cardstock to make my inserts for the pockets and random pieces of paper and stickers to decorate the outside and the inserts. It is an easy journal to make and very uncomplicated to use when traveling. A small bulldog clip will keep the pages and the odds and end you collect from falling out. 

 With just a few simple folds we will turn this folder into a great travel journal. Open the folder up and if you would like you can spray paint the white parts or just leave as is. Pick up your folder and crease in the center so the front and back covers meet.
  This is a penny two pocket folder from Staples.
Sunday, May 27, 2012

Now I am going to make some booklets out of file folders...if I can just find the directions.
Thursday, March 22, 2012
new version of the bunny bags
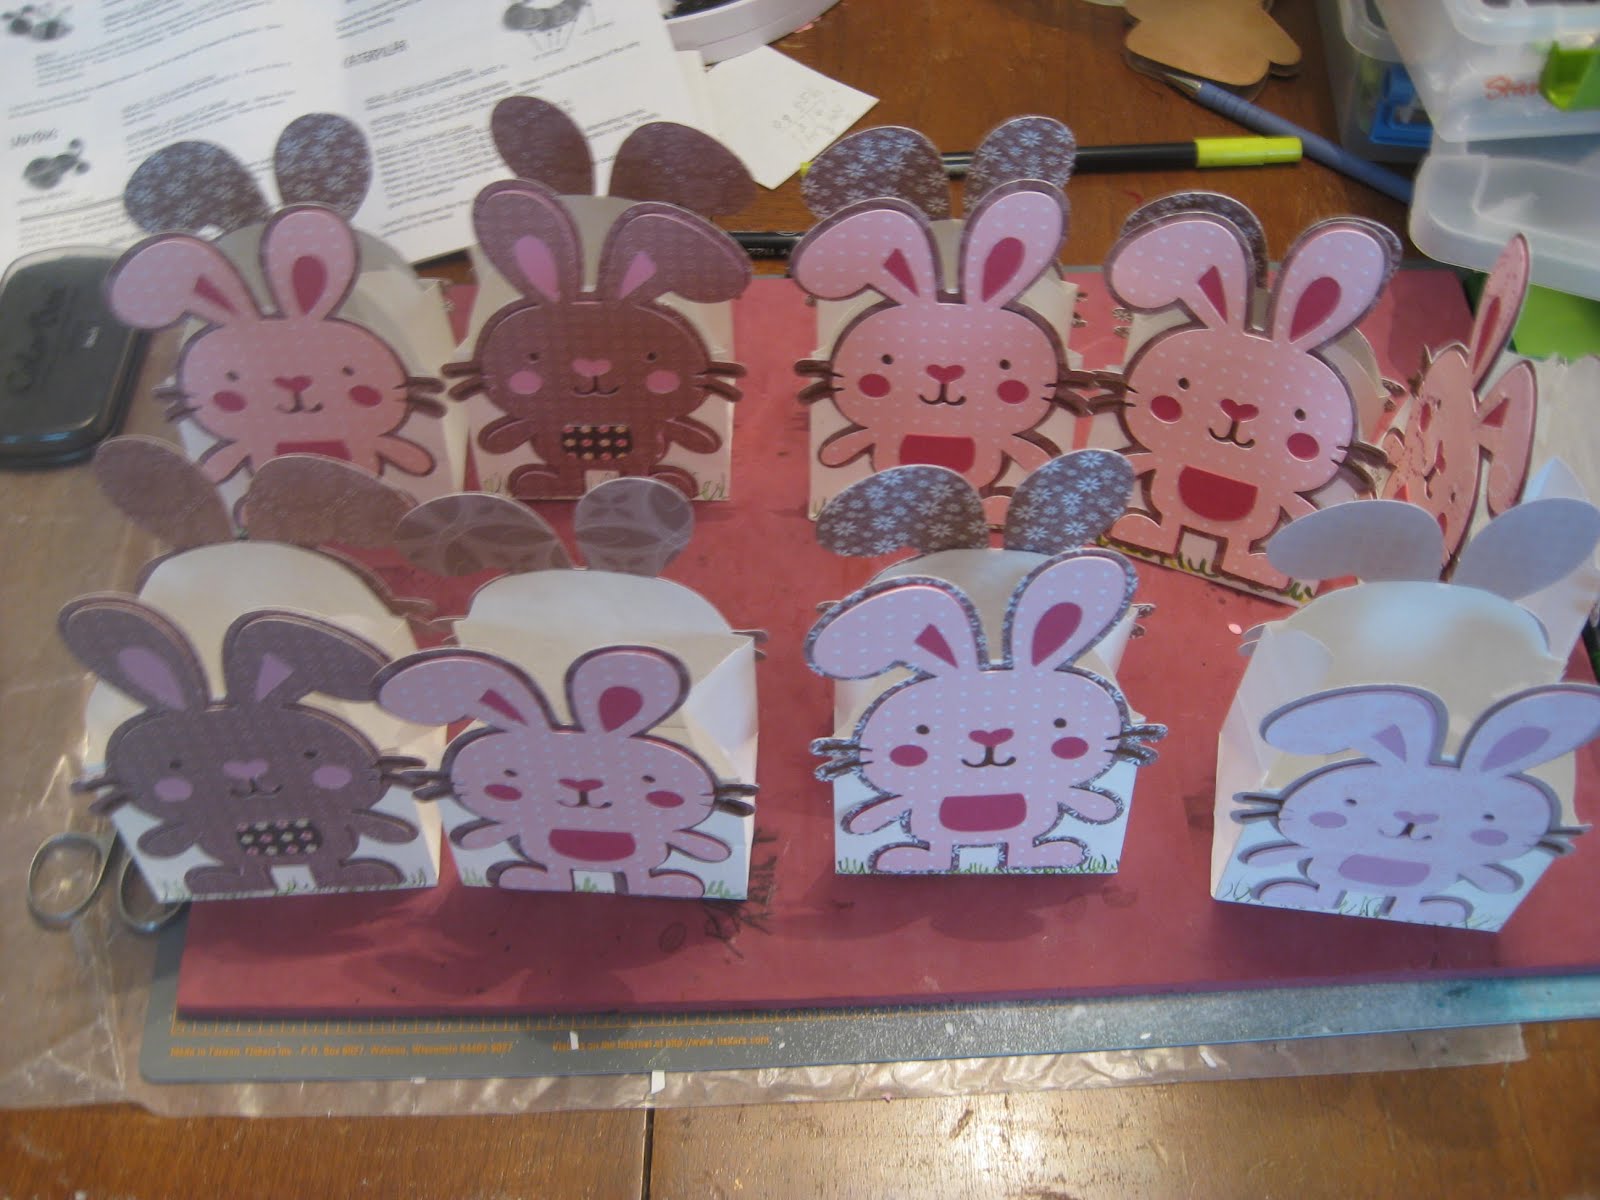

Here are the bunnies all in a row made with the Cricut Create a Critter cartridge in 5" size. I was able to find treat bags to cut down to make the basket part between the bunnies. I also have some wild green grass and candy to fill them up and cellophane bags to drop them into for presentation.
Monday, February 20, 2012
Now for something entirely different


 This has been such a delightful project. This is by Kaisercraft and it is called a mini cubby. There is some basic assembly to do and then the fun begins. This is probably going to be the color that my box remains but it definitely is not the first color I painted it! The box itself is very sturdy and takes a lot of painting and cleaning and painting over without warping. The nine little boxes are a bit more fragile but still study enough for a lot of painting and gluing. The company even included an extra box to use if you have a problem or for a template for cutting the paper for the front. I just papered the front but you could do all four sides and even the bottom. I thought it might slide easier without the paper on the sides. I am still working on the top. I think I want it to look like a meadow with a birds' nest which I will build out of bits and pieces from the yard. This kit cost less than $15. to buy and provided me with hours of entertainment. I can hardly wait to start on my next one. This time I will paint all the parts with a color and make sure I am happy with it before assembling. Kaisercraft has several kits along the lines of this one.
Saturday, February 11, 2012
Dapper Dillinger Trousers
My first real sewing project of the year - Figgy's Dapper Dillinger Flat Front Trousers! Emmett's favorite color is green so I made these for him out of a light weight green corduroy with a contrasting patterned corduroy. My model was very busy playing soldier / rock star but was happy to add these pants to his ensemble. They are actually long enough but I had to tuck the shirt in so you could see the lovely flat front of these pants and that really yanked them up.


Thursday, February 9, 2012
Wreath from Molly's design


 Look from bottom to top since I am never going to get used to adding my first picture last! The hard foam wreath was crocheted to cover with brown and a varigated green yarn. Next a LOT of tiny shamrocks were cut using the Sizzix Big Shot in a dark and light green felt then in four different patterns of fabric. It was fun work and even more fun with help from Carrie. After trying all sorts of patterns I decided on a light to dark transition from the outside to the inside of my wreath. Each shamrock was then pinned with a headed pin into the wreath form. Some tiny bows in green were added for accent. Love the design Molly. Thank you so much for such a pleasant craft project.
Tuesday, February 7, 2012
Valentine plastic canvas completed

Here you see the final product for the plastic canvas lesson shown a few weeks ago. Just adding the silly eyes and nose make them come alive. They are ready for boxing and sending to my grandchildren and their friends for Valentine's day with a chocolate kiss in each one and of course, more kisses from Nana!
Saturday, February 4, 2012
Valentine's Day Heart

There are a couple of things I don't love about Valentine's Day and that pink-on-red color scheme is one of them. Luckily shopping with two little helpers precluded me from getting a chance to pick out a color scheme and limited me to what could be grabbed and thrown into the cart before they knocked each other down again.
I used:
Some inexpensive blue yarn I got for a different project and a crochet hook that was on hand.
A Heart shaped wreath
Origami Paper
Straight pins normally used for sewing.
I had spotted a crochet wreath on Pinterest earlier in the week but the directions were beyond me. I nearly (very nearly) just wrapped the darn thing but took the time to figure something out. This worked really really really well and was fun and exciting for me because it was tight and even.
Use a slip knot to get going.


I really liked the seam. It was strange, but I kept thinking about how nice this stitch would work to cover a cast. The things that go through your mind during crafting....

All week I had been folding origami pinwheels. I really wanted to use the flowers I made last week but they had too much depth. And they took forever to make. Pinwheels were fun and I could do them in the car during pick-up.

Then I pinned them onto the wreath with straight pins.

And, done!

Tuesday, January 31, 2012
I did it!
 Thank you for showing me how to make this. It is so much nicer to assemble than a pattern I have. Lovely to look at. These pages are from Dad's physics book from the 70's. It was in very bad shape and will yield enough flowers to make a bouquet. Fun and easy! Great job Molly.
Sunday, January 29, 2012
Simple Paper Flower
I found this sweet and simple Origami flower on Nifty Thrifty Things. Unfortunately I didn't have any Origami paper so I used light card stock and my handy dandy paper tool. How cute is this flower? To my list of things to do this week I am going to purchase some Origami paper and make a nice flower arrangement of these. Or maybe a wreath?

Saturday, January 28, 2012
Catching Up
Well, I suppose it is harder than I thought to just make one little thing every single week. Not that I haven't been working on learning how to do things correctly - step by step. So far in the last two weeks I have learned so many basic sewing things that I did not know. I did a stitch sampler, practiced different stitch methods and worked on tracing a pattern. But all of these foundations exercises and my Spanish lessons have really eaten into my finished product time schedule. Next week is Catholic Schools week and my oldest son's 6th birthday. My only goal this weekend is to make ONE finished item and a list of things I can work on in the coming weeks. Maybe I am the only one but without a list made during madness I cannot think of things to do in my free time.
Saturday, January 21, 2012
quickie recycling project for old cards
 Before you get rid of all those beautiful cards you receive check and see if you like any of them enough to recycle them. The front of this card was quite a bit larger than I wanted so I cut it down and applied a sticker from the craft store with a foam pop dot to give it a bit of dimension. Now the card front is the right size to place on a new card and send out for another greeting. I make my cards by taking 8 1/2 x 11 card stock and cutting it in half on the long side. Each piece then folds in half to make a card. If the cardstock you choose is a dark color cut a piece of white or cream paper to fit inside for your greeting. Lightly tack the greeting in the inside of the card so it could potentially be used yet again if you send it to a crafty person or you could make a challenge of using old cards and see how many lives you and your friends could give them. I advise taking your old cards apart and throwing out the unusable portion (or shredding them to make more paper!) and taking your fronts to the craft store to shop for matching paper and stickers. If you buy blank cards at the store they come with matching envelopes. I am not sure how my friend, who is not a crafter, will feel about getting her card back but we will see.
Friday, January 20, 2012
weaving a scarf


This is fabric from the craft or sewing store. It is usually used for making pockets in sports bags and lining pockets in hoodies. It comes in a bolt like the rest of the material. This fabric with the big holes is also available in some knitting stores but it is more costly. When you get home you cut your fabric into a width that will be comfortable to wear as a scarf. There are several ways to bind up the edges. You could fold the material over at the edge and seam it on a machine or by hand or you could fold it over and weave through all the layers. Collect all the yarns you might have left over from other projects. I really recommend doing this because it cuts down on your stash and gives you a good reason to go out and buy more or you can buy new yarns to match an outfit. Now the fun begins. I use a plastic needle and weave in and out. That is all there is to it. You can put one line of yarn in and out through the holes or you might have to use several strands of yarn to fill in the spaces. Even young children like doing this. It is great tv time work. It makes a gift worthy of giving.
Saturday, January 7, 2012
Letterpress for the crafter
 Here are my first three cards off my new Letterpress by Epic Crafts. I bought just the starter kit because I had read on the internet that the folder for the actual printing would work being passed through a Big Shot machine which I have and like very much. Hobby Lobby had a large display of the full line of Letterpress materials but for some reason has decided to stop carrying it. I was originally put off by the price of the complete kit. It was in the $169 range. This week I was able to get paper and plates and some inks for $1.50 to $5.39 on their clearance rack. Of all the geegaws they stock endlessly you would think this little beauty would have been given a better shot at succeeding. It works exactly as described and makes a lovely debossed image. There are some very nice and informative videos on Youtube and a hilarious one of a darling couple mass producing their wedding invitations. The wording of an invitation would have to be done on the computer and then the decorating on the letterpress. Love it! PS Keep your fingers off the inked designs for several hours. You will smear your design and clean-up with baby wipes.
A Little Embroidery
I love embroidery and counted cross stitch. I feel like it is paint by number - with thread. But, the back of my pieces (when I finish them) are always so full of knots and tangles that I cannot get them flat enough to to frame. I couldn't imagine adding detail to clothing. And I always got SO frustrated.
So, I got the book A Rainbow of Stitches and brushed up on my technique. The nice thing about this art form is that there really isn't too many different stitches. More importantly, I never really understood about starting off and ending. I think that is where the mess began. So, I brushed up on my stem stitching and back stitching and tried a little free form work (although I used my counted cross stitch fabric for the grid) basked on a parisian pattern from the book. It was so fun!

And, check out the back! No tangles, no knots. Bliss.

Now I am starting to eyeball the curtains, tablecloths, shoes and bags around the house. Would they be cuter with little embroidered motifs all over them....?
Friday, January 6, 2012
Crochet butterfly for Bridget
 This is a pattern from Annie's attic and calls for crochet cotton. I was having trouble following the pattern in the tiny thread so I switched to cotton thread much like string. It worked up quickly and I could see what I was doing. This has been stiffened with Elmers glue and water. It should look pretty on Bridget's wall or in her window.
Tuesday, January 3, 2012
Plastic Canvas Hershey's Kissy
This is going to be a little container for a small candy. A Hershey Kiss would be perfect.
Step 1: Cut three squares of plastic canvas 2 inches by 2 inches (or 10 holes by 10 holes).
Step 2: Cover each in yarn using the Continental needlepoint stitch. Any stitch will do but I think this one is easy to master.
Step 3: Fill 'em in. If you need more information, e-mail me.
Step 4: Put wrong sides of 2 together and whip stitch them together.


Step 5: Without cutting the yarn take the last square and stitch two sides of it to the first one. Now when that is done you have a yawning hole looking at you with raw edges that need to be whipped BUT NOT TOGETHER. The mouth needs to be open.
Step 6: I like to reinforce the corners so they look prettier and do not have a scratchy edge. Now you can add some eye to the top or a nose but just be sure to include a Kiss for the lucky person to receive you craft.
(De)embossed Cards
Part of my crafting revolution is acknowledging that it is a process. By embracing that process I must also acknowledge that learning to do something the night before I want a completed project will invariably result in a crappy craft. So I am trying to plan ahead.
This week I wanted to try making some cards. Since my big guy turns 6 at the end of the month I thought I would make them themed for use with his birthday.
I have a new Cricut Cartridge "Nate's ABC's" which is full of great things for little boys. I also used my brand new Cricut Embossing folder. My practice run (can you believe I took one!?!) was with an owl. Good thing too because I forgot about negative space.
Oops.

Still, I had a nice little cut out owl. So I de-bossed this sweetie onto a couple of cards just for fun.

The next time around I made a nice Monkey.

Then I put the cut-out into the embossing folder.

I don't have the recommended Cricut Die Cutter but I DO have my wonderful Sizzix BIG Shot. I had to use the multi-purpose platform, one of the plastic covers and a couple pieces of paper to make it thick enough but it worked!


Monday, January 2, 2012
Getting organized

I have started by taking a ring binder and placing in it the patterns I would like to work on in January. Notice I did not say complete...just work on. I am already stressed by the word complete. I did complete the binder. That must count for something. In the binder is my pattern I just got from Craftsy for making an apron. There is also the butterfly directions I bought from Annie's Attic and the owl hats from the same source. Those are the patterns I plan to work on first. Completed is the tiny red box just big enough for a Hershey's kiss. That came from the Sizzix die #654969 that Molly bought me for Christmas.
I have so many things to play with from Christmas that I have bags not opened. I am in good position to hunker down until the weather warms up. Feeling very blessed anyhow I opened a fortune cookie for a tiny snack and found this fortune..."You are going to have a very comfortable old age". Might be prudent to play the numbers on the ticket!
Subscribe to:
Comments (Atom)